Welcome to Automatic Hydration!
In this guide, readers will discover how to set up an automatic dog waterer, providing their beloved pets with fresh, clean water effortlessly. Ensuring hydration is vital for every furry friend, and this step-by-step approach makes the process simple and effective.
What You’ll Need

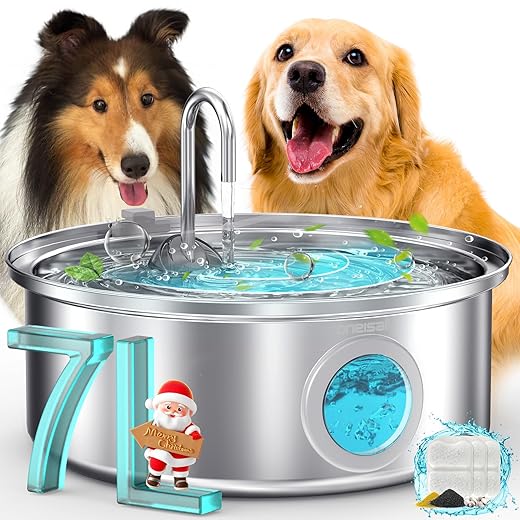
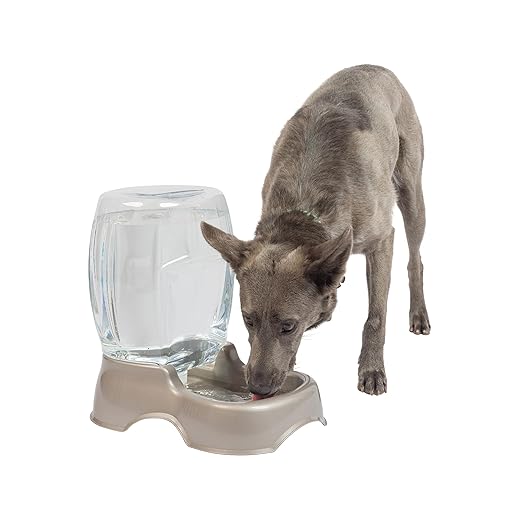
Choose the Right Automatic Dog Waterer
Not All Waterers Are Created Equal—Find Your Perfect Match!Evaluate various types of automatic dog waterers to find the perfect match for your pet’s needs. Gravity-fed models are ideal for large breeds, as they continuously refill the bowl using the force of gravity. For technology enthusiasts, electric waterers feature filters and circulation systems, ensuring clean, fresh water at all times.
Consider bowl styles, which often come with adjustable heights, making them suitable for dogs of all sizes. For example, an elevated bowl can benefit larger dogs by reducing strain on their necks.
Review durability and cleaning features as well. Look for materials that withstand chewing and are easy to disassemble. An automatic waterer with a removable bowl and filter makes routine cleaning effortless, keeping your pet hydrated and healthy with minimal fuss.

Gather Your Tools and Materials
Gear Up! The Right Tools Make All the Difference.Collect all necessary tools and materials before diving into the installation. This preparation will ensure a seamless setup. Begin by securing the following essentials:
Consider additional accessories that may enhance functionality. For instance, a water filter can ensure optimal quality, while a hose stand can prevent kinking or tangling. Having everything in one place will keep the installation process organized and efficient.
Select the Optimal Location
Location, Location, Location—It Matters More Than You Think!Determine the best spot in your home or yard for the automatic dog waterer. Start by assessing areas with adequate shade to avoid overheating during sunny days. Your dog will appreciate a cool, comfortable place to hydrate.
Choose a location that is easily accessible for your pet. Pick a spot near their favorite resting area or play zone, ensuring that they can reach it without obstacles. For example, if your dog loves lounging by the patio door, that could be an ideal spot.
Avoid wet or muddy areas to prevent spills and contamination. Finally, consider proximity to a power source if the waterer is electric, reducing the need for long cords that could pose a tripping hazard. By selecting the right location, you enhance your pet’s drinking experience while maintaining your home’s aesthetics.
Install the Waterer with Precision
Follow These Steps to Avoid a Splash Disaster!Follow these clear steps to install your chosen waterer effectively. Begin by positioning it securely at the selected location. Check the manufacturer’s instructions to understand specific setup requirements.
Connect the water line, if applicable. Ensure all fittings are tight—this will prevent unwanted leaks. For models that simply sit on the ground, fill the reservoir with fresh water, allowing it to flow into the bowl as needed.
Secure any power cords out of the way. Use adhesive clips or ties to route the cable neatly along walls, minimizing the chance of tripping or damage.
Test for leaks by closely monitoring connections after water fills the bowl. If you notice any drips, tighten the connections until they are secure. By taking these careful steps, the waterer will operate smoothly, ensuring your pet always has access to fresh water without any hassle.
Test the System Like a Pro
Is It Working? Don’t Leave Your Pet’s Hydration to Chance!Activate the waterer to initiate testing. Observe the water flow closely to ensure it runs consistently without interruptions.
Check for leaks at all connection points. If you notice any water pooling or dripping, tighten those fittings until they are secure. Using a towel can help you identify moisture that suggests a leak.
Monitor the water level. After several minutes, ensure that the bowl fills to a suitable depth for your dog to drink comfortably. If it’s too low, adjust the flow rate if your model allows.
Evaluate its responsiveness. For example, if your dog approaches the waterer, it should dispense water easily. This practical test ensures it meets your dog’s drinking habits perfectly, providing a stress-free experience for both of you.
Maintain Your Automatic Dog Waterer
Keep It Clean and Functional—Your Dog Will Thank You!Establish a regular cleaning routine. It’s essential to clean the waterer at least once a week. Remove any algae or debris by rinsing the bowl and reservoir with warm, soapy water.
Inspect components frequently. Check for buildup in the water lines or filters. For instance, replace filters as directed by the manufacturer to ensure your dog enjoys fresh water.
Change the water regularly. Even with automatic systems, fresh water is crucial. Empty and refill the reservoir every couple of days to prevent stale water, which your pup might not drink.
Monitor for wear and tear. Pay attention to hoses and seals for signs of aging. Replace any worn parts immediately to maintain optimal function. Following these tips keeps the waterer effective and your dog’s hydration fresh!
Cheers to Happy Hydration!
By following these steps, pet owners can ensure their dogs always have access to fresh water, making for happier, healthier pets. They should give this setup a try and share their results—let’s keep those tails wagging with joy!


I installed mine yesterday, and it’s just so cute! But, my cat keeps trying to drink from it too. Anyone else have this problem? 😂
My cat loves my dog’s waterer too! Gotta keep an eye on them!
Haha, that’s a common issue! Cats can be curious about anything new. Maybe they think it’s a water fountain just for them!
This guide is super helpful! I finally bought an automatic waterer last week, and my pups are loving it! 🐶💦 Just a quick question—how often do you think I should clean it? I want to keep everything fresh!
Hey Jessica! Great to hear your pups are enjoying it! You should clean it at least once a week, but if you notice any algae or build-up, definitely do it more often!
I clean mine every few days, especially in summer. Just keeping it fresh for my doggo!
This is a lifesaver! My dog drinks like a fish, and I was tired of refilling the bowl every hour. The location tips were especially useful since I didn’t know where to put it! Cheers! 🥳
So glad it helped, Kathy! Finding the right spot can make all the difference!
Absolutely! I almost put mine near the front door and realized it would just be a mess. 😂
I’m a bit skeptical about these contraptions. Will they really keep my dog’s water from getting dirty? Mine loves to dunk his toys in everything! 🙄
Great question, Bethany! Many models come with filters that help keep the water clean, but it’s still a good idea to check regularly if your dog likes to play in it!
Yeah, filters help, but if your dog is a toy dunker, you might need to clean it more often. 😂
I love the guide, but I’m curious—what’s the best way to test if the waterer is working correctly? Should I just let it run for a while?
I also suggest watching it for a day or two. Just to be sure everything’s working smoothly.
Exactly, Eric! Let it run for a bit and check for leaks. Make sure the water flow is steady and not too fast!
Ugh, I feel like I need to go back to school to install this thing. Are the instructions really that clear? I’d hate to screw it up!
Don’t worry, Tommy! The steps are designed to be simple and easy to follow. Just take your time and don’t hesitate to ask if you get stuck!
I thought the same, but the guide is super helpful! Just don’t rush it!
I’m not sure about this… the installation part seems tricky. Do I really need all those tools? I’m not exactly Mr. Handy! 😂
Totally get it, Reggie! You don’t need a full toolbox. Most setups only require basic tools like a screwdriver and a wrench. You got this!
Honestly, I’m not handy either, but the guide made it pretty straightforward. Just take your time!
I didn’t realize there were so many models until I read this. I ended up getting a gravity-fed one because I’m lazy, lol. Anyone else use that type?
I have one too! It’s super easy and my pup loves it.
Gravity-fed ones are great! They’re low maintenance and work well for most dogs.
Wow, I didn’t realize how many options there are for waterers! I went with a fountain style, and it’s been amazing. My dog actually drinks more now!
Awesome choice, Nina! Fountains tend to be quite popular since they encourage pets to drink more water.
Fountains are the best! I feel like my dog thinks he’s at a spa or something. 😂
Thanks for the tips! I’m going to try to set this up this weekend. Fingers crossed I don’t break anything! 🤞
You’ll be fine! Just don’t forget to read the instructions carefully.
Good luck, Renee! Just take it slow, and you’ll do great!
I have a question about maintenance. Do I really have to clean all the parts? Seems like a hassle…
Yes, Tanya, it’s important to keep all parts clean for the best performance, but it’s not too bad! Most can be easily disassembled.
I clean mine every other week and it’s not a big deal. Just takes a few minutes!